Thursday, April 7, 2011

Upcycled Wooden Pepsi Crate

I have converted my wooden Pepsi Crate into a wall shelf where I display my watering cans.

Click here for more wooden crate ideas.


Have a great week, and remember to:


Recycle, Reimagine, Repurpose, Reuse.


Until Next Time......


Nora

Saturday, March 19, 2011

Upcycled Vintage Wooden Crates

I just love vintage wooden crates and can rarely resist adding another to my collection. I have found a great way to display an utilize the crates by converting them into wall shelves.

Since my walls are wallpaper over paneling I was able to just use drywall screws to secure my crates. I used some small screw hooks so I could display my tea cups.

I really like the rustic look. One of my crates is unique and has compartments that are perfect for displaying my little finds.


So... next time you come across one of those old wooden crates snatch it up for future display. Stay tuned next week when I'll show you my vintage converted Pepsi crate.

Have a great week, and remember to:

Recycle, Reimagine, Repurpose, Reuse.

Until Next Time......
Nora

Friday, March 11, 2011

Upcycled Birdhouse

The weather is slowly getting warmer a sure sign that spring is on its way. A great time to upcycle a cute little birdhouse.

For my pallet I used a metal birdhouse I found at my local thrift store. My goal was to completely cover the house with bits and pieces of just about anything I could find. I used sequins, buttons, earrings, a watch face, beads, sea glass, broken dishes, glass globs and aquarium rocks.

I started by covering the house front. I used cheap school glue for the light weight items, for the heavy items I used Wellbond.


Once the front was completely covered I let it dry before moving on the sides, back and roof. I found it helped to prop the house up and keep it level when working. I really loved the way it turned out, my birdhouse with bits and pieces.


Have a great week, and remember to:

Recycle, Reimagine, Repurpose, Reuse.

Until Next Time......
Nora

Saturday, March 5, 2011

Western Blue Jean Baby Bib

This is a great way to recycle some of those old jeans. I always have a stash of out dated or outgrown blue jeans and just love to recycle with them. Since they are a nice weight I find they make wonderful baby bibs. Here is how I made the western style baby bibs. I started by cutting up one seam of the jean leg. I opened the leg and placed the center of my pattern over the center of the uncut leg seam. I pinned and cut out my baby bib. Next I placed my contrasting fabric (right side up) over the baby bib (right side up), matching the corner of the contrasting fabric to the center bottom of the bib. I pinned the contrasting fabric in place and cut along the edge of the blue jean fabric, using my baby bib as my guide or pattern for the contrasting fabric. Next I used a zig-zag stitch and machine stitched approximately ½ inch all around the bib edge. I used the same stitch and tacked down the contrasting fabric along the front bottom using the same ½ inches allowance.


I sewed on Velcro for my closure and added a cute star applique from contrasting fabric. Lastly, I snipped the entire bib edge close to the zig-zag stitching, I also snipped the bottom edge of the contrasting fabric. I washed and dried the bib which gave me the fraying effect.

These bibs are just so cute and wash up so nice making them very functional. The contrasting fabric could be changed to pastel colors making it very cute for little girls as well.

Have a great week, and remember to:

Recycle, Reimagine, Repurpose, Reuse.

Until Next Time......
Nora

Friday, February 25, 2011

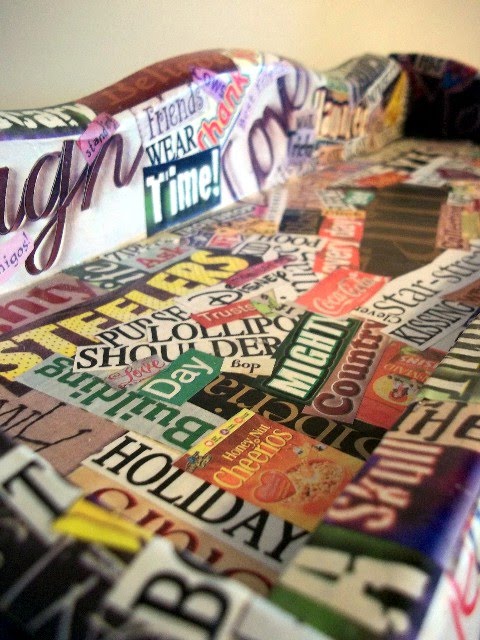
Bread Box Makeover


I love vintage wooden bread boxes and the upcycling possibilities are endless. This box was a yard sale find that was in good shape, but needed a cosmetic makeover.


I decided to try some decoupage on the box. Since I knew the finished project was for my teenage daughter I wanted to try something upbeat. Somehow from that I got the idea to cover the box completely in words from magazines. I clipped and clipped and clipped finding a combination of fonts, colors and size.


I carefully layered the clippings trying to cover all the bare wood that would show when the door was closed. It was time-consuming, but very rewarding. I used watered down Elmer's glue for my decoupage medium. Once the piece was completely dry I used a water based sealer. I really love the way it turned out and more importantly my daughter loved it as well. She uses the recycled bread box to store her video games. Not only are the games a perfect fit, but the finished piece fits her teenage room decor nicely.


Have a great week, and remember to:
Recycle, Reimagine, Repurpose, Reuse.
Until Next Time......
Nora


Friday, February 18, 2011

For The Love Of Old Suitcases

I just love old suitcases. Every time I come across one I have a hard time refusing. They have so much character and come in so many different styles, colors, textures and sizes. These vintage finds are so versatile and have so many uses. My favorite way is to stack, stack and stack....


I often store my finds inside. The only problem with this is that after few months I forget what I have hidden away in the cases. I find myself pulling them down and searching each case to find my forgotten treasures. It's like Christmas Day or a great pick me up in the middle of winter when there are no Garage Sales to be found.


I know there are several ways to revamp old suitcases for new use. Maybe someday I'll give one these techniques a try. Until then I will continue to grab up every new case I find and stack away....


Have a great week, and remember to:
Recycle, Reimagine, Repurpose, Reuse.
Until Next Time......
Nora


Friday, February 11, 2011

My Return

Well.... it has been almost a year since my last post so I decided it was time start posting again.

My latest and greatest project was to collage up a vintage plate.


I have so many pretty yet plain vintage plates. This is a great way to display them. I really enjoyed this project and I can't wait to get started on another.

Have a great week, and remember to:
Recycle, Reimagine, Repurpose, Reuse.

Until Next Time......
Nora

Monday, March 22, 2010

Meet Aunt Agnus


Happy Monday Everyone. Today we have a special guest with us. I am happy to introduce Aunt Agnus to you. It is amazing what you can do with an old pair of panty hose. To make Aunt Agnus was a challenge. I started by hunting down clothing for her. I wanted the perfect suit, gloves, purse and hat.


Next she needed the perfect shoes.


Once I had all my supplies I started on her head. Using an old pair of nylons I stuffed away until I had something similar to the shape of a head. Next was the hardest part, her face. I had to keep starting over, but with practice I finally made a face. The hairdo was fun, I laid stuffing out on cardboard and spray painted it silver. Then I attached it to her head for hair and added some to her face for eyebrows.


The hands were not hard at all. I just stuffed an old pair of gloves.


I posed her hands around her purse. Aunt Agnus always has her purse on her lap. I wonder what she has it there that is so important??? It certainly isn't money.


Her legs and ankles were a bit difficult, but I just kept playing with them until I finally had a pair I liked. I wanted her ankles to be swollen and puffy for an authentic look.


The kids think she is creepy, but I like her. Since her torso is just pillows I can put her in a box when I am sick of her. When I get lonely I bring her back out and set her up for another visit. I sometimes forget she is visiting and am startled to walk in the living room and find her sitting in her chair. I have to go now, Aunt Agnus is calling. If she keeps this up I will be cutting her visit short.


Have a great week.

Recycle, Reimagine, Repurpose, Reuse.......................

Keep On Junking

Nora

Monday, March 15, 2010

Circuit Board Birdhouse


Happy Monday Everyone... All the snow in my yard has melted. Yippee.... In celebration I am sharing a circuit board birdhouse.


I started with a thrift store birdhouse. My son helped me dismantle an old satellite receiver box and salvage the circuit board. I traced the birdhouse front, back and sides on a piece of paper to get my pattern. I taped my pattern on the circuit board and cut out all my pieces and glued them to the birdhouse. After the glue had dried completely, I taped all edges with copper foil tape. Finally, I used my trusty (not) soldering gun and soldered all edges. My soldering skills are sad, but with practice I think this could be a really cool project...


Recycle, Reimagine, Repurpose, Reuse...............

Have a great week...

Keep On Junking
Nora

Monday, March 8, 2010

Repurposed Gloves, Wreath & Metal Tray


Happy Monday Everyone. Today I am sharing a couple of quick projects. Let's start off with a thrift store pair of gloves. I lightly stuffed the inside of each glove and posed one on top of the other to my liking. I stitched here and there making sure they would keep the pose when hung upright. Next using my trusty hot glue gun I added tulle, ribbon and flowers. I added a heavy coat of tea stain and a wire hanger. I love the way they look displayed next to my vintage plate.

For my second quick project I wired a decorative metal tray to a thrift store wreath. Place the wreath face down on you work surface. Place the tray face down on top of the wreath. Hook your wire to the top back of the wreath. Run the wire down the back of the tray and connect to the bottom back of the wreath. Repeat one more time attaching at the sides. What could be easier?


Recycle, Reimagine, Repurpose, Reuse...............

Have a great week...

Keep On Junking
Nora

Monday, March 1, 2010

Mosaic Jewelry Box


Happy Monday Everyone. This is a project I did a while back. The top of this jewelry box had seen better days and was a perfect candidate for a mosaic project. Sometimes referred to as Pique Assiette, using broken pottery shards to make a mosaic project is fun and not all that complicated.

Supplies
dishes (try to find smaller ceramic plates with flower motifs)
tile nippers
large clear plastic bag
clear silicone caulk and caulk gun
Popsicle sticks
rags
sanded grout
plastic bowl
rubber spatula
sponge
rubber gloves


I don't like to smash my dishes with a hammer because you don't have any control over how the pieces break. I place my dish inside a large plastic bag and use my tile nippers to start nipping the plate down. When I first used the nippers I was clumsy, but with practice I learned how to point and hold the nippers on the plate to get the nip in the direction I wanted. I suggest nipping on a practice dish first to get an idea of what you are doing before you start nipping your heirloom china. My first nip is an attempt to get the plate to nip in half. I remove one half and keep the other half in the bag. I continue to nip and remove pieces until I have a manageable size to start nipping into tiles. I continue to nip, dry fitting my pieces as I go until I have covered my surface to my liking. Next, I use the clear silicone to glue all of my pieces. This is messy so keep a damp rag handy to clean and goofs as you work. I use a caulk gun and place a generous amount of silicone on a paper plate. I use a Popsicle stick to butter the back of my tile and place it on my surface. When I have completely covered my surface with my tiles I clean off and excess caulk and let it dry. I like to wait 48 hours before I grout the piece. The grouting process is fun, but again very messy. Completely cover your work area with newspaper. It is hard to gauge how much grout you will need for a project. I prefer to mix more than I will need as opposed to not mixing enough. I use an old plastic bowl to mix my grout in. I add enough water to get the consistency of cake batter. Once the grout is mixed you need to let it sit for ten minutes. I use this time to gather any additional supplies I might need. I apply the grout using a rubber spatula, making sure I get in every groove, scraping my spatula in different angles and directions. After the grout has been applied, I wait an additional ten minutes to let the grout sit up. Then, I use a damp sponge to start cleaning off the excess grout from the tiles. Next I use a dry paper towel to clean off the top of the tiles. Once the grout has completely cured seal the grout with a grout sealer. Now sit back and admire your new work of art.

Oh, one more thing, I wanted to tell you I have been featured on another blog. I am so very honored. Please visit, read the post and comment here.

Recycle, Reimagine, Repurpose, Reuse...............

Keep On Junking
Nora